What is Arduino?
If you are stuck at wondering what is Arduino, you landed right on Arduino Tutorial for Beginners. Arduino is a versatile tool for controlling electronic devices. It can be thought of as a tool, much like a pencil is used for writing. While a pencil is used for writing, Arduino is used for controlling electronics. You can use Arduino for a wide range of projects, from reading sensors to controlling motors, displays, and more.
Inputs and Outputs
In Arduino, electronic devices can be categorized into two general groups: inputs and outputs.
- Inputs: These are devices that gather information. Examples include temperature sensors, light sensors, touch sensors, and many others.
- Outputs: These are devices that perform actions. Examples include motors, displays, LED lights, and speakers.
Arduino allows you to read data from inputs and control outputs, making it a versatile tool for a wide array of applications.
How Does Arduino Work? (3 Main Parts)
Arduino comprises three main components:
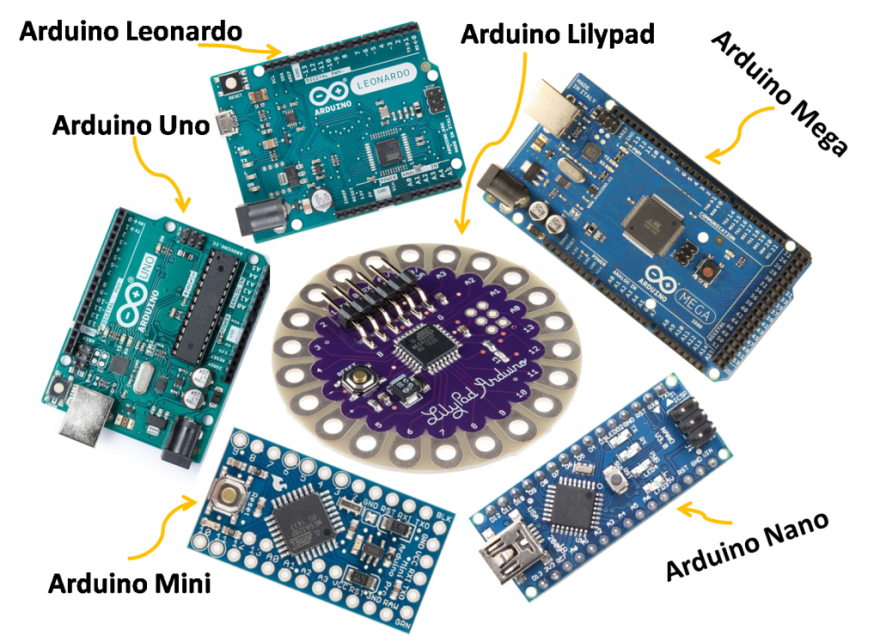
1. Arduino Boards
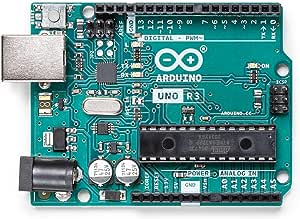
Arduino boards are the physical components that form the foundation of Arduino projects. They come in various types, with the Arduino Uno being a popular choice. All Arduino boards have a microcontroller, which is a small computer that enables you to interact with electronic components.
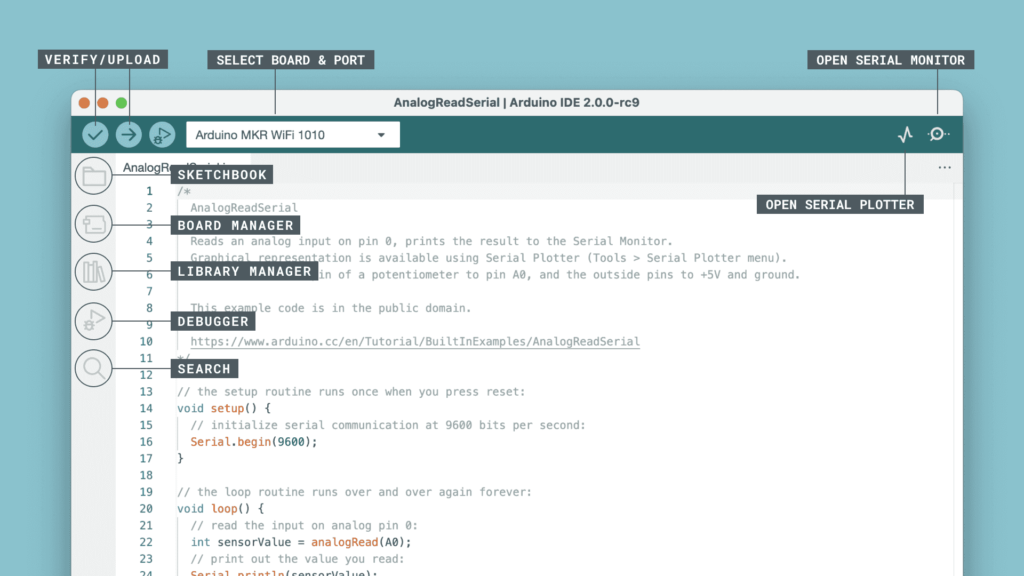
2. Arduino IDE (Integrated Development Environment)
The Arduino IDE is a software application that you install on your computer. It serves as a platform for writing and uploading code to Arduino boards. It’s user-friendly and resembles a simple text editor, making it accessible to beginners.
3. Arduino Code (Sketch)
The code you write within the Arduino IDE is called a “sketch.” It’s based on the C and C++ programming languages but includes Arduino-specific functions and structure. This code is loaded onto the microcontroller on the Arduino board, allowing you to control inputs and outputs.
Why is Arduino So Popular? An explanation for Arduino Tutorial for Beginners
Arduino’s popularity can be attributed to several factors:
- Simplicity: Arduino boards are designed for ease of use, making them accessible to a wide range of users. They feature convenient USB connectivity, header pins for easy component connections, and external power options.
- User-Friendly IDE: The Arduino IDE is straightforward, with no unnecessary complexity. Uploading code to the board is as simple as pressing a button.
- Beginner-Friendly Code: Arduino code includes functions for reading inputs and controlling outputs, making it less intimidating for beginners. Additionally, there are numerous libraries available to simplify the use of various components.
- Open Source: Arduino is open source, allowing various companies to create compatible boards and contributing to a vast hardware and software ecosystem.
- Affordability: Arduino hardware is cost-effective, making it accessible to hobbyists and students.
Is Arduino Right for Your Project?
Arduino is an excellent choice for projects that involve both inputs and outputs and require some logical processing in between. If your project follows the pattern of reading inputs, applying logic, and controlling outputs, Arduino is a great fit.
However, if your project involves intensive tasks like video processing or extensive computations, other technologies may be more suitable. Arduino is best suited for smaller-scale projects with a focus on electronics control and automation.
In the comments, feel free to share your Arduino project ideas and let us know what you’re excited to build using this versatile platform!
Which Arduino to Buy? (My Advice > Arduino UNO if you are a beginner!)
If you’re new to Arduino and wondering which board to purchase, this guide will help you make an informed decision. It’s important to choose the right Arduino board to match your learning needs and project requirements. Additionally, you may have encountered the term “Arduino compatible” when shopping for boards, which can be somewhat confusing. In this guide, we will clarify what “Arduino compatible” means and whether such boards are suitable for use with the Arduino IDE and Arduino code.
Choosing the Right Arduino Board
If you haven’t purchased an Arduino board yet, the recommended choice for beginners is the Arduino Uno Rev 3. Here’s why:
- Popularity: The Arduino Uno is widely popular, and as a result, you’ll find a wealth of resources, code, and tutorials specifically designed for it. This makes the learning process smoother.
- General Purpose I/O Pins (GPIO): Arduino Uno offers 20 GPIO pins for reading inputs and controlling outputs, which is more than sufficient for most basic projects.
- Standard Layout: The Arduino Uno’s layout is a widely adopted standard used by most Arduino accessories called shields, making it compatible with various expansions.
The only minor inconvenience is that you’ll need a Type A/B USB cable (commonly used with printers) to connect the Arduino Uno to your computer. If you haven’t purchased a board yet, consider buying the Arduino Uno Rev 3, and it’s recommended to get it directly from the Arduino website to support the Arduino organization.
Compatibility of Other Arduino Boards
What if you already have a different Arduino board, such as the Mega, Nano, or a board that doesn’t explicitly say “Arduino” but resembles the Uno? The good news is that most Arduino-compatible boards will likely work seamlessly with the Arduino IDE. This is possible because of Arduino’s open-source nature.
Arduino is both a company and an open-source platform. The hardware design of Arduino boards, the Arduino IDE (the software used to program Arduino), and the Arduino programming language are all open source. This means that other companies and individuals can create boards based on the same design and use the Arduino IDE.
So, if you have a board labeled “Arduino compatible,” it should work with the Arduino IDE without issues. Moreover, the code you write for one board will often require only minor modifications to run on another board. Switching between different Arduino boards typically doesn’t require a complete rewrite of your code.
In summary, most Arduino-compatible boards should work well with the Arduino IDE, and code portability is usually not a significant issue.
Exploring Arduino Simulators
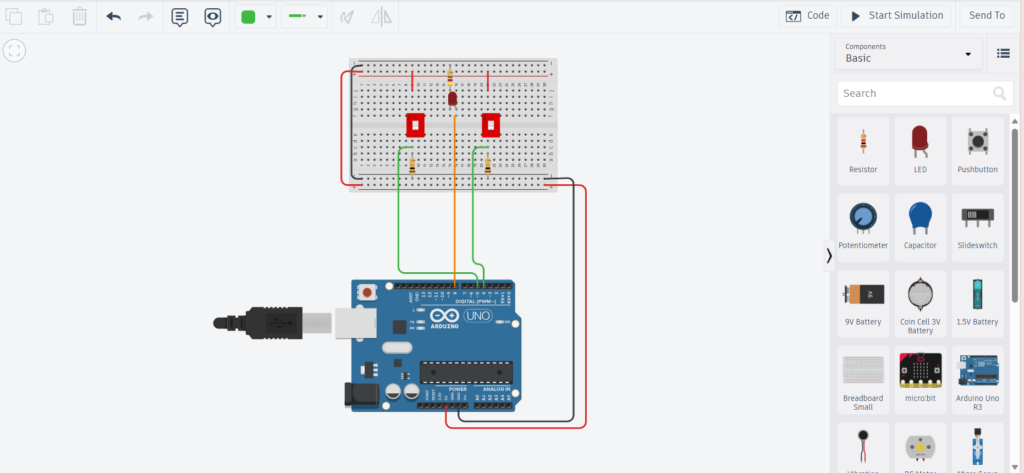
If you’re eager to start experimenting with Arduino but don’t have a board or want to test the waters before making a purchase, there are free Arduino simulators available. One excellent option is Tinkercad, which is created by Autodesk. Tinkercad provides a robust Arduino simulator where you can use an Arduino Uno board, build circuits, and write code within the simulator. It’s a fantastic way to get hands-on experience without a physical board.
While Tinkercad Arduino Simulator has some limitations, such as the availability of components and board options, it’s an excellent starting point for beginners who are on a tight budget.
In conclusion, understanding your options and making informed choices will greatly benefit your Arduino journey. The Arduino Uno Rev 3 is an ideal choice for beginners, but many other Arduino-compatible boards are also suitable. Additionally, Arduino simulators like Tinkercad provide an excellent platform for learning and experimenting without the need for a physical board.
Which Arduino IDE to Use?
When it comes to programming your Arduino board, the Arduino company provides three different Integrated Development Environments (IDEs) for free. In this guide, we’ll explore these IDEs and help you determine which one suits your needs best.
Original Arduino IDE
The original Arduino IDE is a classic and straightforward choice. To download it, visit the Arduino website, select your operating system, and follow the installation steps. The original IDE is stable and reliable.
Key Features:
- Simple and minimalist interface.
- Suitable for beginners with a focus on learning and programming.
- Limited distractions, making it easy to get started with Arduino.
- Excellent for educational purposes and getting started with programming.
Arduino Web Editor
The Arduino Web Editor is an online IDE that operates within your web browser. To use it, you need to create an Arduino account and sign in. This web-based editor is especially handy for those who work on different computers or use Chromebooks, as it doesn’t require installation on a specific device.
Key Features:
- Accessible from any device with a web browser.
- Useful for those who frequently switch between computers.
- Provides a cloud-based platform to save and access your sketches.
- Allows you to share your sketches through links or embedded codes.
- Free to use, with a potential limit on the number of sketches.
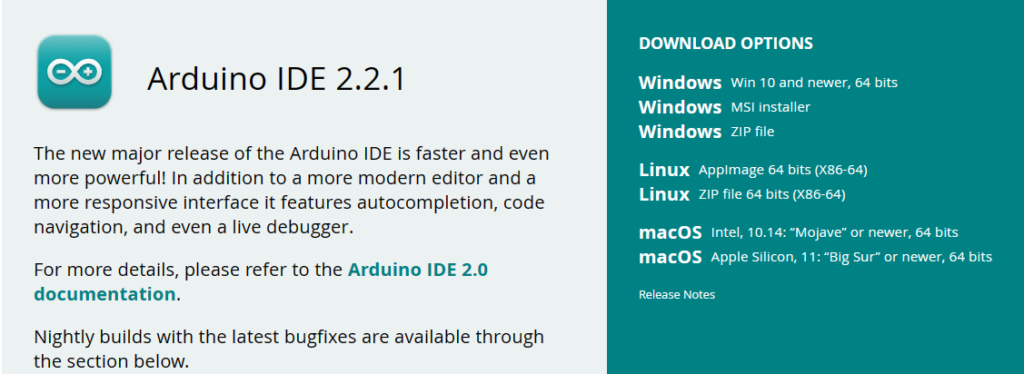
Arduino IDE 2.0 (New IDE)
The Arduino IDE 2.0 is a modern and feature-rich update to the original IDE. It offers an enhanced user experience with features like auto-complete, code collapsing, and debugging capabilities. You can install it alongside the original IDE without conflicts.
Key Features:
- A modern and visually appealing interface.
- Enhanced functionality, including auto-complete and code collapsing.
- Debugging capabilities for supported boards.
- Active development with potential for additional features and improvements.
- Suitable for both beginners and advanced users.
Using Visual Studio Code (VS Code)
While not an official Arduino IDE, you can also use Visual Studio Code (VS Code) with the Arduino extension to write and upload Arduino code. Microsoft maintains this extension, allowing you to combine the power of VS Code with Arduino development.
Key Features:
- Versatile IDE with numerous extensions and capabilities.
- Ideal for those already familiar with Visual Studio Code.
- Provides additional features and customization options.
- Can be used to program and upload code to Arduino boards.
Which One to Choose?
The choice of Arduino IDE depends on your preferences and needs:
- If you’re new to Arduino and want a simple, beginner-friendly IDE, go for the Original Arduino IDE.
- If you need a cloud-based solution for mobility or work with Chromebooks, consider the Arduino Web Editor.
- If you prefer a more modern and feature-rich IDE with auto-complete and debugging capabilities, explore the Arduino IDE 2.0.
- If you’re already comfortable with Visual Studio Code, you can use it with the Arduino extension for additional functionality.
Ultimately, the Arduino code you write is the same across all these IDEs, so your choice comes down to your preferred interface and additional features.
Enough Learning! time to have some fun – Let’s start with the Arduino
Step-1 Buy an Arduino Board!
Buy your Arduino UNO device from a shop nearby.
Step-2 Download and Install Arduino IDE!
Visit Arduino website to download latest version of Arduino IDE.
Step-3 Arduino Code for Absolute simple project!
Use this below simple code for a blinking LED Project. Arduino how to make an led blink!
Arduino: How to Make an LED Blink
In this tutorial, we will walk you through the absolute simplest Arduino project – making an LED blink. This project is designed to be straightforward and easy to understand, making it an ideal starting point for beginners. All you need is an LED, a 220-ohm resistor, and just a few lines of code. We’ll skip the use of a breadboard for simplicity, so let’s get started.
Hardware Components
To build this basic circuit, you will need:
- An LED
- A 220-ohm resistor
Wiring the Circuit
- Begin by wrapping one leg of the 220-ohm resistor around the longer lead of the LED, which is the anode (the positive lead).
- Insert the cathode (the negative lead) of the LED into one of the Arduino’s ground (GND) pins.
Connecting the Resistor
- Take the other lead of the resistor and plug it into any of the digital I/O pins on the Arduino. In this example, we’ll use pin 12.
Writing the Code
Now, let’s move to the software side of the project by using the Arduino IDE:
- Open the Arduino IDE.
- You’ll find two main functions in your Arduino code:
void setup()andvoid loop(). - In the code, add the following line to define an integer variable and make the code more readable:
int led_pin = 12; - In the
setup()function, specify that pin 12 is used as an output with this line of code:pinMode(led_pin, OUTPUT); - In the
loop()function, add two lines to turn the LED on and off, creating a one-second blink interval.
- To turn the LED on:
digitalWrite(led_pin, HIGH); - To turn the LED off:
digitalWrite(led_pin, LOW);
Uploading and Running the Code
- Save your code by clicking “File” and selecting “Save.” Give your sketch a name, such as “blink_LED.ino.”
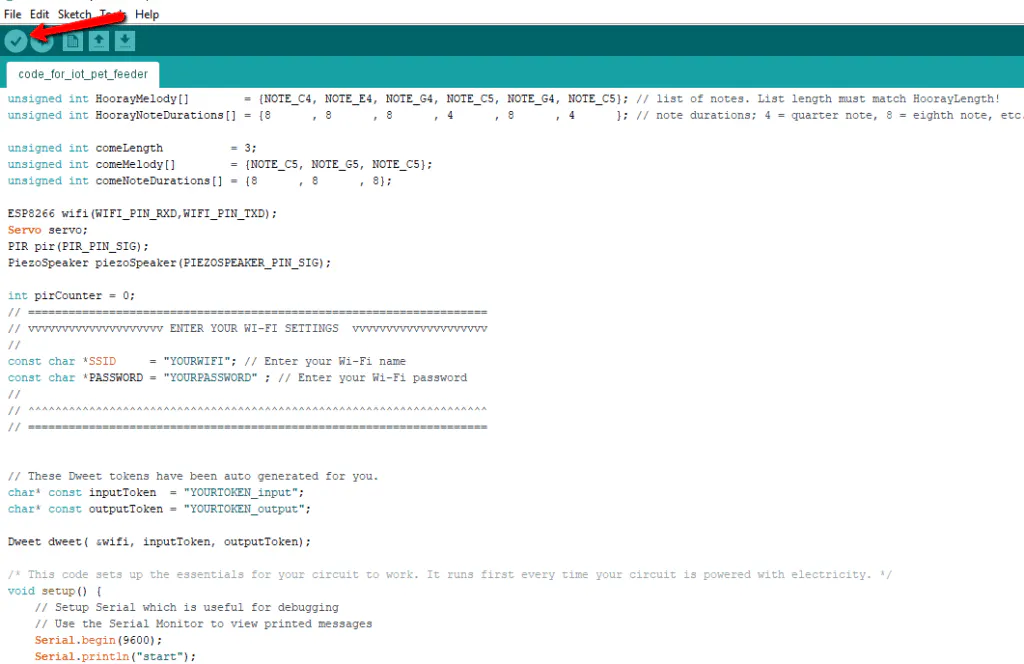
- To upload the code to your Arduino, click the arrow button at the top left corner of the Arduino IDE.
- Your code will be compiled and uploaded to the Arduino’s microcontroller.
- Within a second or two, your LED should start blinking.
That’s all there is to it! The power of the Arduino platform lies in its simplicity and ease of use. This basic project is just the beginning. With a few more LEDs and additional lines of code (which you can find at this link), you can create more advanced projects and expand your skills.
Have fun experimenting with Arduino and exploring its endless possibilities!
Start your first project Blink an LED (An Awesome Arduino UNO Project) today.
FAQs
What is the Arduino IDE, and where can I download it?
What are the three main Arduino IDEs, and what are their differences?
Original Arduino IDE: A simple and beginner-friendly IDE available for various operating systems. It’s a lightweight text editor for writing code.
Arduino Web Editor: An online IDE that allows you to write and upload code directly from your web browser. It’s suitable for users who need the flexibility of an online editor.
Arduino IDE 2.0: A modern and feature-rich IDE that offers advanced features like code autocompletion and debugging. It’s a good choice for more experienced users.
Can I use Visual Studio Code to program Arduino boards?
How can I create a simple Arduino project with an LED that blinks?
Connect an LED and a 220-ohm resistor to an Arduino board.
Write code in the Arduino IDE to control the LED.
Upload the code to the Arduino board.
The LED should start blinking at a one-second interval.
Do I need a resistor when connecting an LED to an Arduino board?
Can I experiment with different digital pins when connecting an LED to an Arduino board?
How do I upload the code to my Arduino board using the Arduino IDE?
Connect your Arduino board to your computer.
Open your code in the Arduino IDE.
Click the “Upload” button (a right-pointing arrow) in the IDE.
The code will be compiled and uploaded to your Arduino board.
Can I modify the blinking interval of the LED in the Arduino project?
delay function in the code. For example, if you want the LED to blink every two seconds, change delay(1000) to delay(2000) to double the interval.